Connecting to the Camera via an Existing Network (Wi-Fi STA Mode)
The camera connects to a smart device on an existing network (including home networks) via a wireless LAN access point. The smart device can still connect to the Internet while wirelessly connected to the camera. A list of the cameras that support this feature can be found here.
Before Connecting via Wi-Fi
- Enable Wi-Fi on the smart device in advance. For details, see the documentation for your smart device.
- Be sure the batteries in the camera and smart device are fully charged to prevent unexpected loss of power.
- Check that there is space remaining on the camera memory card.
- The following are unavailable in Wi-Fi STA mode:
- Manual location data download
- The [Nickname] option in the SnapBridge menu
- Bluetooth remote control
- Camera firmware download and transfer
- Wi-Fi STA mode enables automatic download of pictures only for pictures taken while connected to Wi-Fi. Pictures are downloaded at a size of 2 megapixels. Pictures taken while the Wi-Fi connection between the camera and smart device is lost will not be transferred automatically even if they have been selected for upload on the camera. Furthermore, pictures for which automatic download was interrupted will not be downloaded again.
Note: To use these functions, exit Wi-Fi STA mode and pair the camera and smart device. See here to learn how to exit Wi-Fi STA mode.
Can’t Switch to Wi-Fi STA Mode?
- Wi‑Fi STA mode cannot be enabled while pictures are automatically being downloaded from the camera. Wait until pictures have completed downloading before switching to Wi‑Fi STA mode.
- You cannot switch to Wi-Fi STA mode immediately after completing or interrupting the process of downloading pictures from the camera. After downloading pictures or interrupting transfer, wait at least three minutes before switching.
Can’t Connect via Wi-Fi?
If you are unable to connect via Wi-Fi, follow the steps here to try again.
Backgrounding SnapBridge While Connected in Wi-Fi STA Mode
Running the SnapBridge app in the background with another app displayed in the foreground may cause the Wi-Fi connection with the camera to be lost. This can be addressed by displaying (foregrounding) the app on the smart device and the connection with the most recently connected camera will be reestablished.
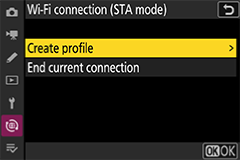
Camera: In the network menu, select [Connect to smart device] > [Wi-Fi connection (STA mode)] > [Create profile], then press the J button.
Note: If the [Wi-Fi connection (STA mode)] option is not displayed on a model that supports Wi-Fi STA mode, update the camera’s firmware to the latest version.
Camera: Enter the profile name.
- If you do not wish to change the profile name, press the X button to proceed to the connection configuration screen.
- Configured profile names can be viewed as a list by selecting [Connect to smart device] > [Wi-Fi connection (STA mode)] in the network menu.
- To change a profile name, press the J button. When prompted, enter the desired profile name and press the X button to save the setting. For information on text entry, see the documentation provided with the camera.
Camera: Highlight [Search for Wi-Fi network] and press the J button.
The camera will search for wireless LAN access points in its vicinity and display the SSIDs of detected access points.
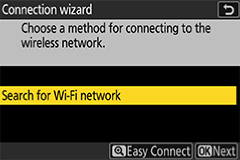
Connecting Using [Easy Connect]
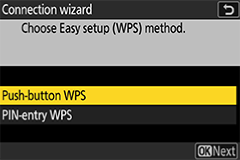
By pressing the X button in Step 3, you can connect to a wireless LAN access point without entering the SSID or encryption key. Press the J button and select the connection type. After the connection is established, proceed to Step 6.
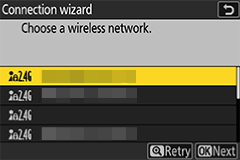
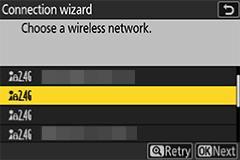
Camera: Highlight the SSID of the access point.
- Highlight the SSID of the access point and press the J button.
- The frequencies of detected SSIDs are indicated in the icons.
- The h icon is displayed next to encrypted SSIDs. If you select an SSID with the h icon, you will be prompted to enter the encryption key. If you have selected an SSID without the h icon, proceed to Step 6.
- Press the X button to search again for wireless access points.
Hidden SSIDs
If the SSID of a wireless access point is hidden, it will not be displayed on the list of detected SSIDs.
- To connect to a hidden SSID, highlight an empty option and press the J button. Then, press the J button to display the SSID entry screen.
- Enter the SSID of the access point you wish to connect to, then press the X button. Press the X button again to display the screen to configure the encryption key.
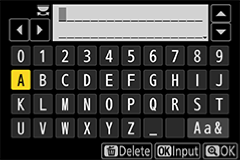
Camera: Enter the encryption key.
Press the J button and enter the encryption key used for the wireless LAN access point.
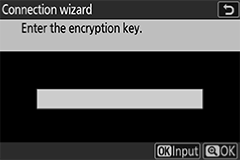
- For details on wireless LAN access point encryption keys, see the documentation for the wireless LAN access point.
Press the X button to finish entering the encryption key.
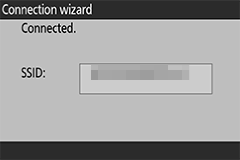
Press the X button again to establish a connection. If a connection is successfully established, the display shown in the figure will be displayed for a few seconds.
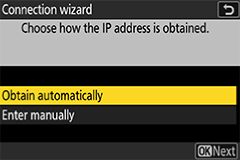
Camera: Highlight the method to configure the IP address and press the J button.
Camera: When the IP address configuration completion screen is displayed, press the J button.
The camera name for Wi-Fi connection will be displayed.
- Smart device: In the Wi-Fi connection settings menu of the operating system, connect to the SSID selected in Step 4.
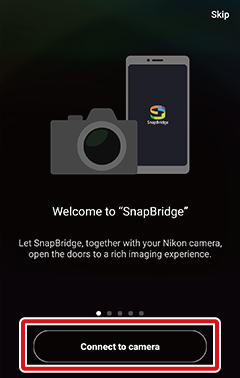
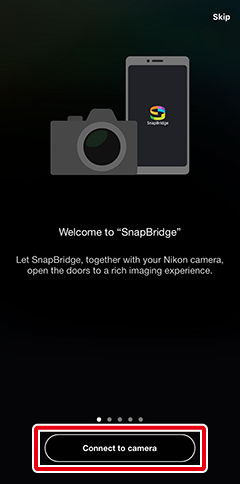
Smart device: Launch the SnapBridge app.
Tap [Connect to camera].
If You Tapped [Skip] or Have Previously Launched the SnapBridge App
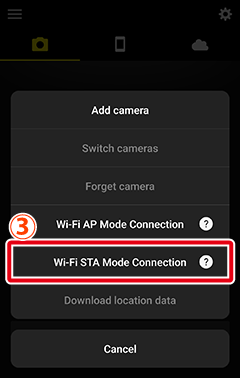
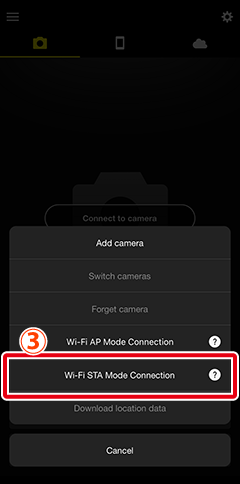
Tap the
 button in the
  tab, select [Wi-Fi STA Mode Connection], and proceed to Step 12.
No [Wi-Fi STA Mode Connection] Option?
Check that the SnapBridge app is up to date. If you are using the latest version and this option is still missing, exit the app, check that the device is connected to the Internet, and then re-launch the app.
To exit the app, you must also terminate it in the background. The procedure varies with the smart device; see the documentation provided with your device for details.
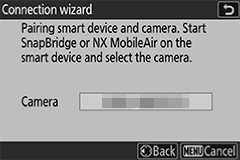
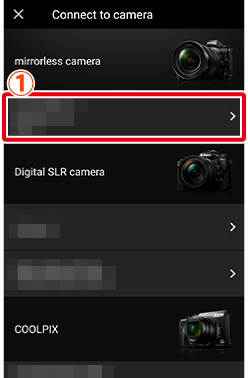
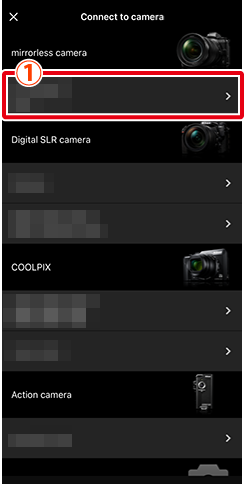
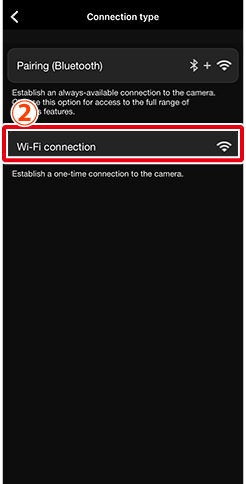
Smart device: Tap the desired model, and then tap [Wi-Fi connection] when prompted.
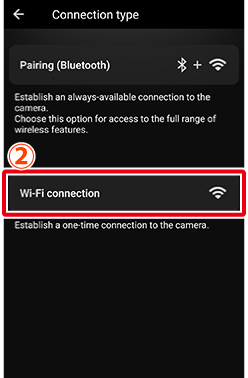
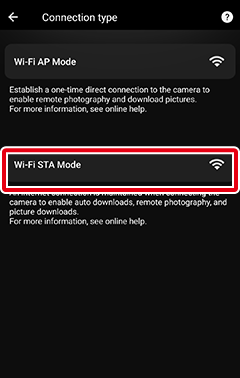
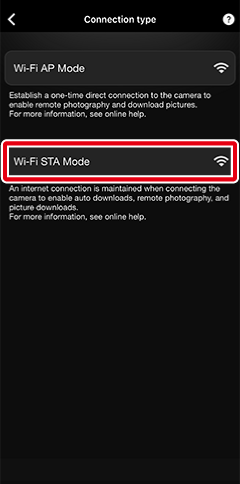
Smart device: Tap [Wi-Fi STA Mode].
Mode Selection Screen Not Displayed?
On some cameras, the screen that allows you to select [Wi-Fi AP Mode] or [Wi-Fi STA Mode] may not be displayed. If this applies to your camera, return to Step 9 and tap [Skip]. Then tap the
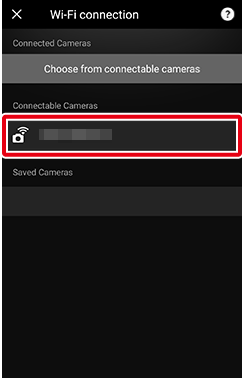
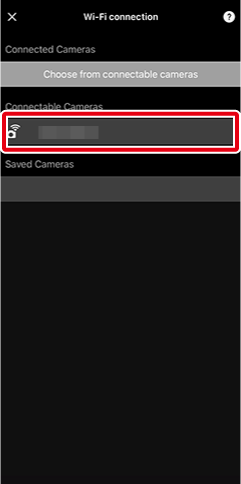
button in the tab, select [Wi-Fi STA Mode Connection], and proceed to Step 12.Smart device: Tap the camera name displayed in Step 7.
The camera name will be displayed in the [Connectable Cameras] field.
Camera Name Not Displayed?
On the Wi-Fi connection menu of the operating system, check that the smart device is connected to the same SSID as the wireless LAN access point that the camera is connected to. If the smart device is connected to a different SSID than the camera, change the connection settings on the operating system menu so that the smart device is connected to the same SSID as the camera.
Camera Selection Screen
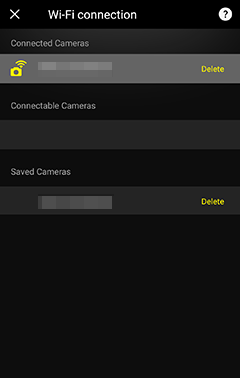
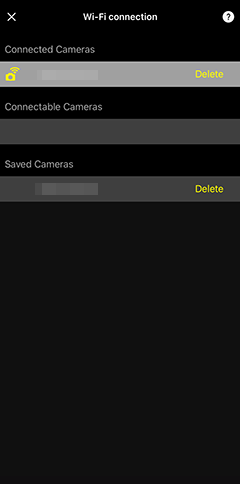
- [Connected Cameras]: The name of the camera currently connected via Wi-Fi is displayed.
- [Connectable Cameras]: Names of cameras that have been detected but are not connected are displayed.
- [Saved Cameras]: Names of cameras for which connection settings have been saved on SnapBridge are displayed.
Camera/smart device: Operate the camera and smart device to complete the connection.
Camera: When the connection completion screen is displayed, press the J button.
Smart device: When the J button is pressed on the camera, the camera and the smart device will be connected via Wi-Fi. Tap
 to display the Wi-Fi STA mode screen.
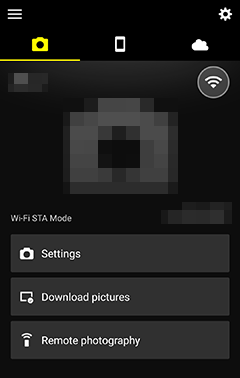
The Connection Status Icon
- An icon indicating the connection status is shown at the top right of the tab display. The statuses indicated by each icon are as follows.
 : The SnapBridge app is in Wi-Fi STA mode without a Wi-Fi connection to the camera.
 : The smart device is searching for wireless LAN access points.
 : The smart device is connected to the camera via Wi-Fi.
- Tap the “Wi-Fi connected” icon to temporarily suspend the Wi-Fi connection with the camera and reduce the drain on the smart device battery. Tap the “suspended” icon to reestablish connection.
Closed the Screen Before Establishing Connection?
If you tap
to close the screen before establishing a Wi-Fi connection with the camera, the disconnected Wi-Fi STA mode screen will be displayed. To resume the connection, perform Steps 1 through 7 on the camera, then tap [Connect to camera] in the Wi-Fi STA mode screen on SnapBridge and proceed to Step 12.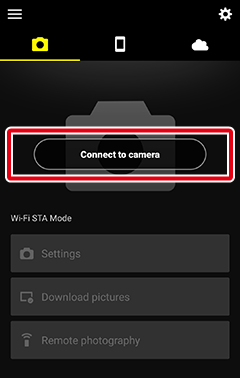
Subsequent Wi-Fi STA Mode Connections
If the last camera connected during the most recent connection is detected in Step 12, the smart device will automatically connect to that camera.
- An icon indicating the connection status is shown at the top right of the
Before Connecting via Wi-Fi
- Enable Wi-Fi on the smart device in advance. For details, see the documentation for your smart device.
- Be sure the batteries in the camera and smart device are fully charged to prevent unexpected loss of power.
- Check that there is space remaining on the camera memory card.
- The following are unavailable in Wi-Fi STA mode:
- Manual location data download
- The [Nickname] option in the SnapBridge menu
- Bluetooth remote control
- Camera firmware download and transfer
- Wi-Fi STA mode enables automatic download of pictures only for pictures taken while connected to Wi-Fi. Pictures are downloaded at a size of 2 megapixels. Pictures taken while the Wi-Fi connection between the camera and smart device is lost will not be transferred automatically even if they have been selected for upload on the camera. Furthermore, pictures for which automatic download was interrupted will not be downloaded again.
Note: To use these functions, exit Wi-Fi STA mode and pair the camera and smart device. See here to learn how to exit Wi-Fi STA mode.
Can’t Switch to Wi-Fi STA Mode?
You cannot switch to Wi-Fi STA mode immediately after completing or interrupting the process of downloading pictures from the camera. After downloading pictures or interrupting transfer, wait at least three minutes before switching to Wi‑Fi STA mode.
Can’t Connect via Wi-Fi?
If you are unable to connect via Wi-Fi, follow the steps here to try again.
Backgrounding SnapBridge While Connected in Wi-Fi STA Mode
Running the SnapBridge app in the background with another app displayed in the foreground may cause the Wi-Fi connection with the camera to be lost. This can be addressed by displaying (foregrounding) the app on the smart device and the connection with the most recently connected camera will be reestablished.
Camera: In the network menu, select [Connect to smart device] > [Wi-Fi connection (STA mode)] > [Create profile], then press the J button.
Note: If the [Wi-Fi connection (STA mode)] option is not displayed on a model that supports Wi-Fi STA mode, update the camera’s firmware to the latest version.
Camera: Enter the profile name.
- If you do not wish to change the profile name, press the X button to proceed to the connection configuration screen.
- Configured profile names can be viewed as a list by selecting [Connect to smart device] > [Wi-Fi connection (STA mode)] in the network menu.
- To change a profile name, press the J button. When prompted, enter the desired profile name and press the X button to save the setting. For information on text entry, see the documentation provided with the camera.
Camera: Highlight [Search for Wi-Fi network] and press the J button.
The camera will search for wireless LAN access points in its vicinity and display the SSIDs of detected access points.
Connecting Using [Easy Connect]
By pressing the X button in Step 3, you can connect to a wireless LAN access point without entering the SSID or encryption key. Press the J button and select the connection type. After the connection is established, proceed to Step 6.
Camera: Select the SSID of the access point.
- Highlight the SSID of the access point and press the J button.
- The frequencies of detected SSIDs are indicated in the icons.
- The h icon is displayed next to encrypted SSIDs. If you select an SSID with the h icon, you will be prompted to enter the encryption key. If you have selected an SSID without the h icon, proceed to Step 6.
- Press the X button to search again for wireless access points.
Hidden SSIDs
If the SSID of a wireless access point is hidden, it will not be displayed on the list of detected SSIDs.
- To connect to a hidden SSID, highlight an empty option and press the J button. Then, press the J button to display the SSID entry screen.
- Enter the SSID of the access point you wish to connect to, then press the X button. Press the X button again to display the screen to configure the encryption key.
Camera: Enter the encryption key.
Press the J button and enter the encryption key used for the wireless LAN access point.
- For details on wireless LAN access point encryption keys, see the documentation for the wireless LAN access point.
Press the X button to finish entering the encryption key.
Press the X button again to establish a connection. If a connection is successfully established, the display shown in the figure will be displayed for a few seconds.
Camera: Highlight the method to configure the IP address and press the J button.
Camera: When the IP address configuration completion screen is displayed, press the J button.
The camera name for Wi-Fi connection will be displayed.
- iOS device: In the Wi-Fi connection settings menu of the operating system, connect to the SSID selected in Step 4.
iOS device: Launch the SnapBridge app.
Tap [Connect to camera].
If You Tapped [Skip] or Have Previously Launched the SnapBridge App
Tap the
button in the tab, select [Wi-Fi STA Mode Connection], and proceed to Step 12.
No [Wi-Fi STA Mode Connection] Option?
Check that the SnapBridge app is up to date. If you are using the latest version and this option is still missing, exit the app, check that the device is connected to the Internet, and then re-launch the app.
To exit the app, you must also terminate it in the background. See here for details on exiting the app.
iOS device: Tap the desired model, and then tap [Wi-Fi connection] when prompted.
iOS device: Tap [Wi-Fi STA Mode].
Mode Selection Screen Not Displayed?
On some cameras, the screen that allows you to select [Wi-Fi AP Mode] or [Wi-Fi STA Mode] may not be displayed. If this applies to your camera, return to Step 9 and tap [Skip]. Then tap the
button in the tab, select [Wi-Fi STA Mode Connection], and proceed to Step 12.iOS device: Tap the camera name displayed in Step 7.
The camera name will be displayed in the [Connectable Cameras] field.
Camera Name Not Displayed?
On the Wi-Fi connection menu of the operating system, check that the smart device is connected to the same SSID as the wireless LAN access point that the camera is connected to. If the smart device is connected to a different SSID than the camera, change the connection settings on the operating system menu so that the smart device is connected to the same SSID as the camera.
Camera Selection Screen
- [Connected Cameras]: The name of the camera currently connected via Wi-Fi is displayed.
- [Connectable Cameras]: Names of cameras that have been detected but are not connected are displayed.
- [Saved Cameras]: Names of cameras for which connection settings have been saved on SnapBridge are displayed.
Camera/iOS device: Operate the camera and smart device to complete the connection.
Camera: When the connection completion screen is displayed, press the J button.
iOS device: When the J button is pressed on the camera, the camera and the smart device will be connected via Wi-Fi. Tap
to display the Wi-Fi STA mode screen.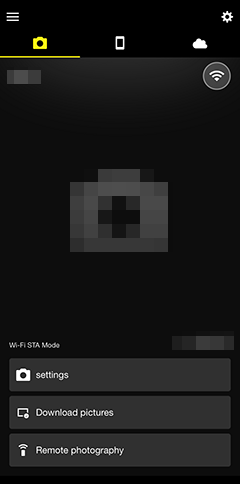
The Connection Status Icon
- An icon indicating the connection status is shown at the top right of the tab display. The statuses indicated by each icon are as follows.
- : The SnapBridge app is in Wi-Fi STA mode without a Wi-Fi connection to the camera.
- : The smart device is searching for wireless LAN access points.
- : The smart device is connected to the camera via Wi-Fi.
- Tap the “Wi-Fi connected” icon to temporarily suspend the Wi-Fi connection with the camera and reduce the drain on the smart device battery. Tap the “suspended” icon to reestablish connection.
Closed the Screen Before Establishing Connection?
If you tap
to close the screen before establishing a Wi-Fi connection with the camera, the disconnected Wi-Fi STA mode screen will be displayed. To resume the connection, perform Steps 1 through 7 on the camera, then tap [Connect to camera] in the Wi-Fi STA mode screen on SnapBridge and proceed to Step 12.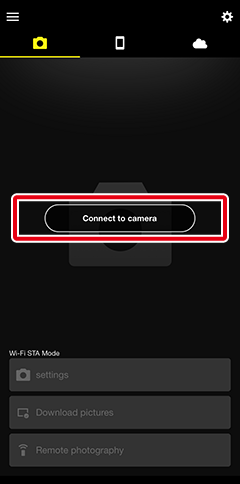
Subsequent Wi-Fi STA Mode Connections
If the last camera connected during the most recent connection is detected in Step 12, the smart device will automatically connect to that camera.
- An icon indicating the connection status is shown at the top right of the