Bluetooth Pairing
Use SnapBridge to pair the camera with your smart device as described below.
Before Pairing
- Enable Bluetooth on the smart device in advance. If the device is running an Android version earlier than version 12, location services will also need to be enabled. For details on enabling location services, see the documentation for your smart device.
- Be sure the batteries in the camera and smart device are fully charged to prevent unexpected loss of power.
- Check that there is space remaining on the camera memory card.
Nikon Z Mount Mirrorless Cameras
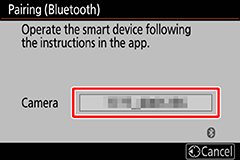
- Camera: Turn the camera on.
Camera: In the camera menus, select [Connect to smart device] > [Pairing (Bluetooth)] > [Start pairing], then press the J button.
The camera name will be displayed in the monitor.
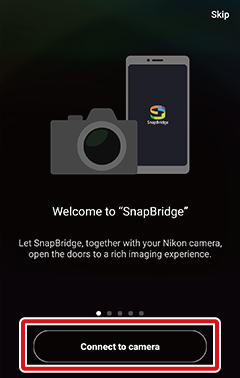
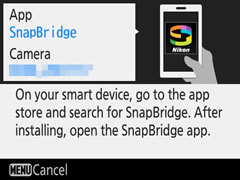
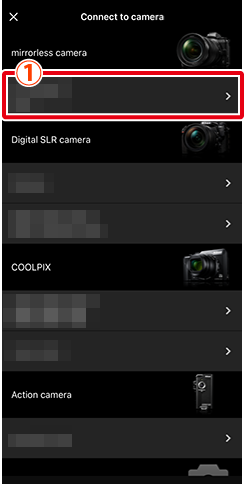
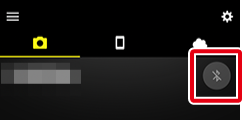
Smart device: Launch the SnapBridge app.
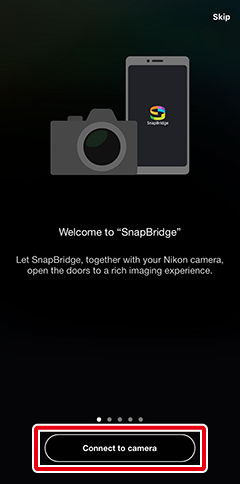
Tap [Connect to camera].
Pairing After Launch
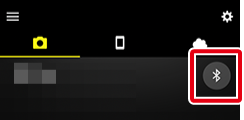
If you skipped pairing by tapping [Skip] at the top right corner of the welcome dialog, tap [Connect to camera] in the
 tab and proceed to the next step.
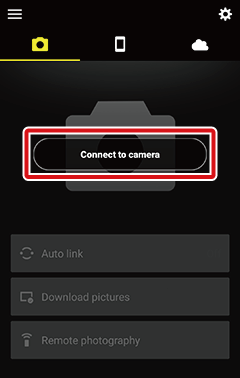
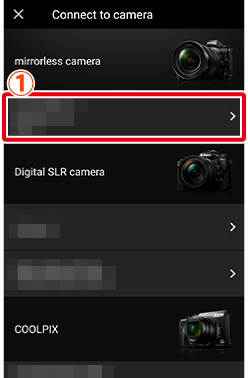
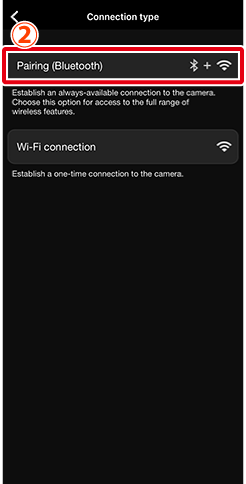
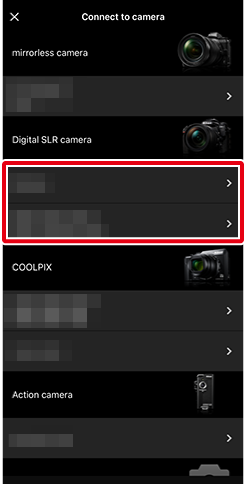
Smart device: Tap the desired model, and then tap [Pairing (Bluetooth)] when prompted.

Note: This step will not be required the next time the devices are paired.
Note: If you are using a version of Android earlier than version 12, you will need to enable location services when using Bluetooth. Be sure to grant location access if prompted.
Note: If you are using Android version 12 or later, you will need to grant Bluetooth permissions (permission to search for and connect to nearby Bluetooth devices). Be sure to grant permission if prompted.
Supported Camera Not Displayed?
Check that the SnapBridge app is up to date. If you are using the latest version and no option for your camera is displayed, exit the app, check that the device is connected to the Internet, and then re-launch the app.
To exit the app, you must also terminate it in the background. The procedure varies with the smart device; see the documentation provided with your device for details.
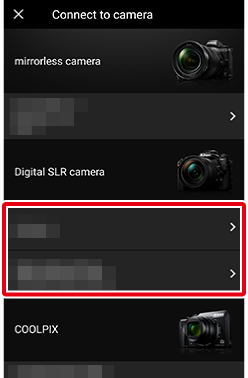
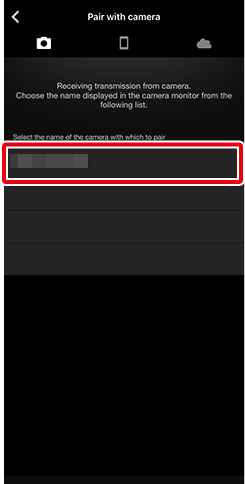
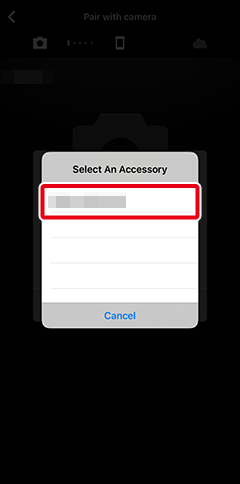
Smart device: Tap the camera name.
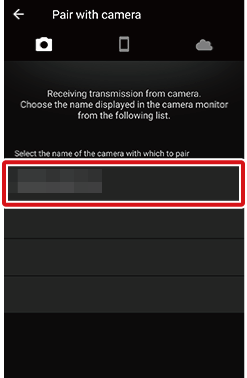
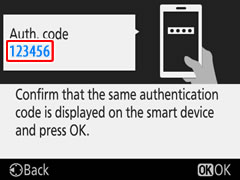
Camera/smart device: Confirm that the camera and smart device display the same authentication code.
The code is circled in red in the illustrations.
Smart device
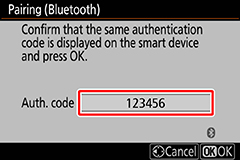
Camera
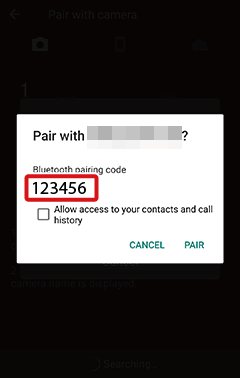
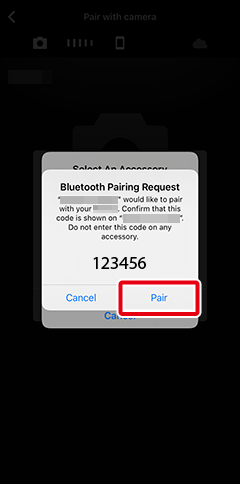
Camera/smart device: Initiate pairing.
Camera: Press the J button on the camera.
Smart device: Tap the area circled in red.
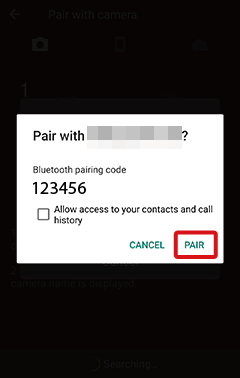
Note: The [PAIR] button circled in red in the illustration may be labelled differently in different versions of the operation system.
Smart device: Tap [OK] when pairing is complete.
The
tab will be displayed.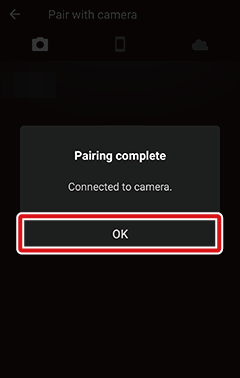
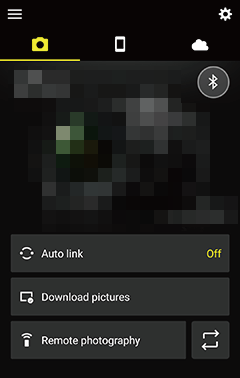
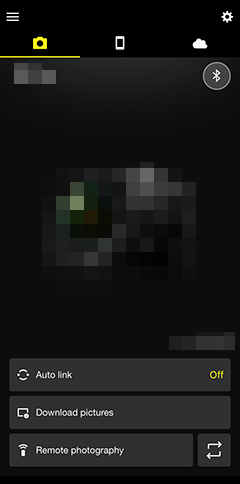
The Connection Status Icon
An icon indicating the connection status is shown at the top right of the
tab display. The statuses indicated by each icon are as follows.No Bluetooth signal detected from the camera. If no signal can be detected even when your device is close to the camera, check the camera’s network settings.
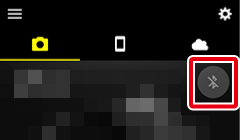
The SnapBridge app has detected the camera’s Bluetooth signal. You can now access the SnapBridge app’s various features.
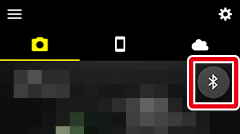
The SnapBridge app has established a Bluetooth connection to the camera or is in the process of downloading pictures.

If Pairing Fails
If an error occurs during pairing, read the solutions here before attempting pairing again.
Pairing with Multiple Cameras
To pair with additional cameras, tap  , select [Add camera], and repeat Steps 4–8. SnapBridge can be used to pair with up to 5 cameras.

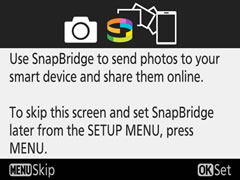
Launching SnapBridge for the First Time
If prompted to grant the SnapBridge app permission to access storage, location data, or pictures on the smart device, and for notifications, follow the on-screen instructions. Many features cannot be used without granting permission.
Other Cameras
Note: The displays for some cameras may differ from those shown here.
- Camera: Turn the camera on.
Camera: In the camera menus, select [Connect to smart device] > [Start], or for some cameras, [Connect to smart device] > [Pairing (Bluetooth)] > [Start pairing], then press the J button.
Note: On some cameras, the [Start] option is not displayed. In such cases, there is no need to select the option.
When the camera displays either of the pairing dialogs below, ready your smart device and proceed to the next step.
Other Prompts
If the following prompt is displayed, press the J button.
If the following prompt is displayed, touch the NFC antenna part of the smart device against the
 (N mark) on the camera to use the NFC function. Once SnapBridge has been launched, proceed to Step 7. If you do not wish to use NFC, press the J button and proceed to the next step.
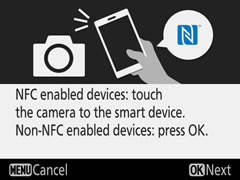
Smart device: Launch the SnapBridge app.
Tap [Connect to camera].
Pairing After Launch
If you skipped pairing by tapping [Skip] at the top right corner of the welcome dialog, tap [Connect to camera] in the
tab and proceed to Step 4.Camera Name Not Displayed
SnapBridge may not show the camera name if launched before the camera displays the launch prompt (Step 2). In such cases, exit SnapBridge and tap the SnapBridge icon to launch SnapBridge again.
To exit the app, you must also terminate it in the background. The procedure varies with the smart device; see the documentation provided with your device for details.
Smart device: Tap the desired model.
Note: This step will not be required the next time the devices are paired.
Note: If you are using a version of Android earlier than version 12, you will need to enable location services when using Bluetooth. Be sure to grant location access if prompted.
Note: If you are using Android version 12 or later, you will need to grant Bluetooth permissions (permission to search for and connect to nearby Bluetooth devices). Be sure to grant permission if prompted.
Supported Camera Not Displayed?
Check that the SnapBridge app is up to date. If you are using the latest version and no option for your camera is displayed, exit the app, check that the device is connected to the Internet, and then re-launch the app.
To exit the app, you must also terminate it in the background. The procedure varies with the smart device; see the documentation provided with your device for details.
Smart device: Tap the camera name.
Camera/smart device: Confirm that the camera and smart device display the same authentication code.
The code is circled in red in the illustrations.
Smart device
Camera
Camera/smart device: Initiate pairing.
Camera: Press the J button on the camera.
Smart device: Tap the area circled in red.
Note: The [PAIR] button circled in red in the illustration may be labelled differently in different versions of the operation system.
Camera/smart device: Follow the on-screen instructions to finish pairing.
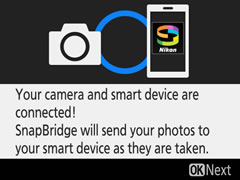
Camera: Press J. When pairing is complete, the camera will display a message stating the camera and smart device are connected. Press J and follow the on-screen instructions.
Note: Depending on the camera, a dialog may appear in place of this message. The dialog will clear from the display automatically.
Smart device: Pairing is complete. Tap [OK] to exit to the
tab.The Connection Status Icon
An icon indicating the connection status is shown at the top right of the
tab display. The statuses indicated by each icon are as follows.No Bluetooth signal detected from the camera. If no signal can be detected even when your device is close to the camera, check the camera’s network settings.
The SnapBridge app has detected the camera’s Bluetooth signal. You can now access the SnapBridge app’s various features.
The SnapBridge app has established a Bluetooth connection to the camera or is in the process of downloading pictures.
If Pairing Fails
If an error occurs during pairing, read the solutions here before attempting pairing again.
Pairing with Multiple Cameras
To pair with additional cameras, tap , select [Add camera], and repeat Steps 4–8. SnapBridge can be used to pair with up to 5 cameras.
Launching SnapBridge for the First Time
If prompted to grant the SnapBridge app permission to access storage, location data, or pictures on the smart device, and for notifications, follow the on-screen instructions. Many features cannot be used without granting permission.
Before Pairing
- Enable Bluetooth and location services on the smart device in advance. For details, see the documentation for your smart device.
- Be sure the batteries in the camera and smart device are fully charged to prevent unexpected loss of power.
- Check that there is space remaining on the camera memory card.
Nikon Z Mount Mirrorless Cameras
- Camera: Turn the camera on.
Camera: In the camera menus, select [Connect to smart device] > [Pairing (Bluetooth)] > [Start pairing], then press the J button.
The camera name will be displayed in the monitor.
iOS device: Launch the SnapBridge app.
Tap [Connect to camera].
Pairing After Launch
If you skipped pairing by tapping [Skip] at the top right corner of the welcome dialog, tap [Connect to camera] in the
tab and proceed to the next step.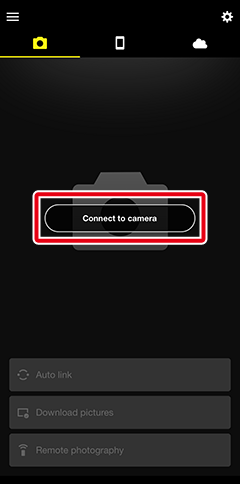
iOS device: Tap the desired model, and then tap [Pairing (Bluetooth)] when prompted.
Note: This step will not be required the next time the devices are paired.
Supported Camera Not Displayed?
Check that the SnapBridge app is up to date. If you are using the latest version and no option for your camera is displayed, exit the app, check that the device is connected to the Internet, and then re-launch the app.
To exit the app, you must also terminate it in the background. See here for details on exiting the app.
iOS device: Tap the camera name.
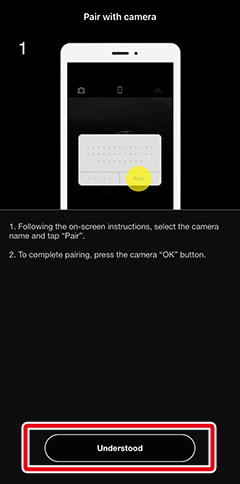
iOS device: Read the pairing instructions.
Instructions on how to pair the devices will be displayed. Read the instructions carefully and tap [Understood].
iOS device: Tap the camera name again.
A dialog that shows the camera name will be displayed. Tap the camera name again.
Camera/iOS device: Initiate pairing.
Camera: Press the J button on the camera.
iOS device: Tap the area circled in red.
Note: The [Pair] button circled in red in the illustration may be labelled differently in different versions of the operation system.
Pairing Errors
If you wait too long between pressing the button on the camera and tapping the button in SnapBridge, pairing will fail and an error will be displayed.
Camera: Press J and return to Step 1.
iOS device: Exit SnapBridge and request iOS to “forget” the camera, and return to Step 1. See here for details on “forgetting” the device.
To exit the app, you must also terminate it in the background. See here for details on exiting the app.
iOS device: Tap [OK] when pairing is complete.
The
tab will be displayed.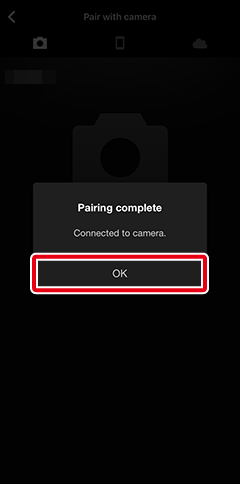
The Connection Status Icon
An icon indicating the connection status is shown at the top right of the
tab display. The statuses indicated by each icon are as follows.No Bluetooth signal detected from the camera. If no signal can be detected even when your device is close to the camera, check the camera’s network settings.
The SnapBridge app has detected the camera’s Bluetooth signal. You can now access the SnapBridge app’s various features.
The SnapBridge app has established a Bluetooth connection to the camera or is in the process of downloading pictures.

If Pairing Fails
If an error occurs during pairing, read the solutions here before attempting pairing again.
Pairing with Multiple Cameras
To pair with additional cameras, tap , select [Add camera], and repeat Steps 4–9. SnapBridge can be used to pair with up to 5 cameras.
Launching SnapBridge for the First Time
If prompted to grant the SnapBridge app permission to access pictures on the smart device, follow the on-screen instructions.
Other Cameras
Note: The displays for some cameras may differ from those shown here.
- Camera: Turn the camera on.
Camera: In the camera menus, select [Connect to smart device] > [Start], or for some cameras, [Connect to smart device] > [Pairing (Bluetooth)] > [Start pairing], then press the J button.
Note: On some cameras, the [Start] option is not displayed. In such cases, there is no need to select the option.
When the camera displays either of the pairing dialogs below, ready your smart device and proceed to the next step.
Other Prompts
If either of the following messages is displayed, press the J button repeatedly until the pairing start screen is displayed.
iOS device: Launch the SnapBridge app.
Tap [Connect to camera].
Pairing After Launch
If you skipped pairing by tapping [Skip] at the top right corner of the welcome dialog, tap [Connect to camera] in the
tab and proceed to Step 4.Camera Name Not Displayed
iOS device: Tap the desired model.
Note: This step will not be required the next time the devices are paired.
Supported Camera Not Displayed?
Check that the SnapBridge app is up to date. If you are using the latest version and no option for your camera is displayed, exit the app, check that the device is connected to the Internet, and then re-launch the app.
To exit the app, you must also terminate it in the background. See here for details on exiting the app.
iOS device: Tap the camera name.
iOS device: Read the pairing instructions.
Instructions on how to pair the devices will be displayed. Read the instructions carefully and tap [Understood].
iOS device: Tap the camera name again.
A dialog that shows the camera name will be displayed. Tap the camera name again.
Camera/iOS device: Initiate pairing.
Camera: Press the J button on the camera.
iOS device: Tap the area circled in red.
Note: The [Pair] button circled in red in the illustration may be labelled differently in different versions of the operation system.
Pairing Errors
If you wait too long between pressing the button on the camera and tapping the button in SnapBridge, pairing will fail and an error will be displayed.
Camera: Press J and return to Step 1.
iOS device: Exit SnapBridge and request iOS to “forget” the camera, and return to Step 1. See here for details on “forgetting” the device.
To exit the app, you must also terminate it in the background. See here for details on closing the app.
Camera/iOS device: Follow the on-screen instructions to finish pairing.
Camera: Press J. When pairing is complete, the camera will display a message stating the camera and smart device are connected. Press J and follow the on-screen instructions.
Note: Depending on the camera, a dialog may appear in place of this message. The dialog will clear from the display automatically.
iOS device: Pairing is complete. Tap [OK] to exit to the
tab.The Connection Status Icon
An icon indicating the connection status is shown at the top right of the
tab display. The statuses indicated by each icon are as follows.No Bluetooth signal detected from the camera. If no signal can be detected even when your device is close to the camera, check the camera’s network settings.
The SnapBridge app has detected the camera’s Bluetooth signal. You can now access the SnapBridge app’s various features.
The SnapBridge app has established a Bluetooth connection to the camera or is in the process of downloading pictures.
If Pairing Fails
If an error occurs during pairing, read the solutions here before attempting pairing again.
Pairing with Multiple Cameras
To pair with additional cameras, tap , select [Add camera], and repeat Steps 4–9. SnapBridge can be used to pair with up to 5 cameras.
Launching SnapBridge for the First Time
If prompted to grant the SnapBridge app permission to access pictures on the smart device, follow the on-screen instructions.