Connecting via Wi-Fi to Cameras That Support the Wireless Mobile Utility
The SnapBridge app can be used to connect to cameras that support the Wireless Mobile Utility (WMU) directly via Wi-Fi (Wi-Fi AP mode). A list of the cameras that support this feature can be found here.
Before Connecting via Wi-Fi
- Enable Wi-Fi on the smart device in advance. For details, see the documentation for your smart device.
- Be sure the batteries in the camera and smart device are fully charged to prevent unexpected loss of power.
- Check that there is space remaining on the camera memory card.
Wi‑Fi AP Mode Not Available?
- Wi‑Fi AP mode cannot be enabled while pictures are automatically being downloaded from the camera. Wait until pictures have completed downloading before switching to Wi‑Fi AP mode.
- You cannot switch to Wi-Fi AP mode immediately after completing or interrupting the process of downloading pictures from the camera. After downloading pictures or interrupting transfer, wait at least three minutes before switching.
Smart device: Launch the SnapBridge app.
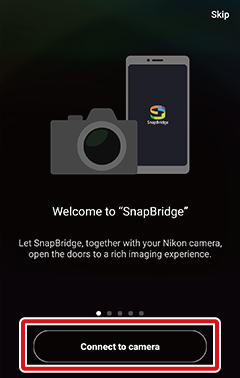
Tap [Connect to camera].
If You Tapped [Skip] or Have Previously Launched the SnapBridge App
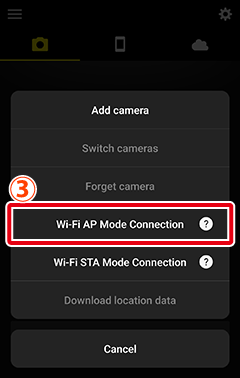
Tap the
 button in the
  tab, select [Wi-Fi AP Mode Connection], and proceed to Step 3.
No [Wi-Fi AP Mode Connection] Option?
Check that the SnapBridge app is up to date. If you are using the latest version and this option is still missing, exit the app, check that the device is connected to the Internet, and then re-launch the app.
To exit the app, you must also terminate it in the background. The procedure varies with the smart device; see the documentation provided with your device for details.
Smart device: When prompted to select the camera type, tap the desired model.
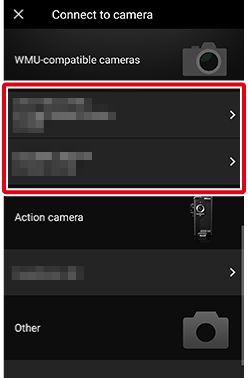
Supported Camera Not Displayed?
Check that the SnapBridge app is up to date. If you are using the latest version and no option for your camera is displayed, exit the app, check that the device is connected to the Internet, and then re-launch the app.
To exit the app, you must also terminate it in the background. The procedure varies with the smart device; see the documentation provided with your device for details.
Smart device: When the instructions on camera operations are displayed, turn the camera on and proceed to the next step.
Do not tap [Next] yet.
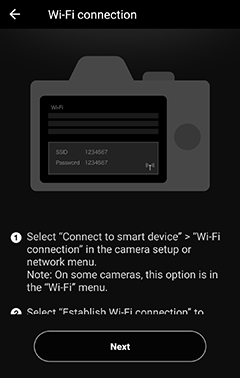
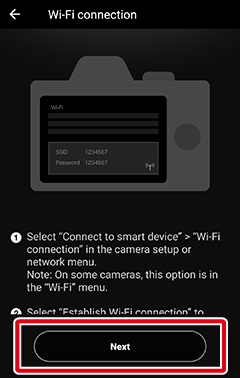
Camera: In the camera menus, enable the Wi-Fi connection and display the camera SSID.
Note that the method varies with the camera. For more information, see the documentation provided with the camera.
Smart device: Return to the smart device and tap [Next].
Smart device: After reading the instructions displayed by the smart device, tap [Open the device settings app].
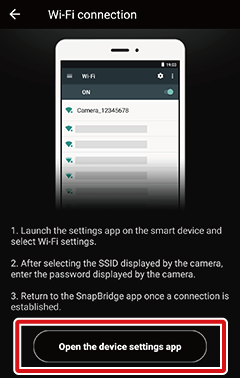
The smart device Wi‑Fi settings dialog will be displayed.
- Smart device: Select the camera SSID to connect to the camera via Wi-Fi.
Smart device: Return to the SnapBridge app and wait for the smart device to connect.
Wi‑Fi AP mode options will be displayed once a connection is established.
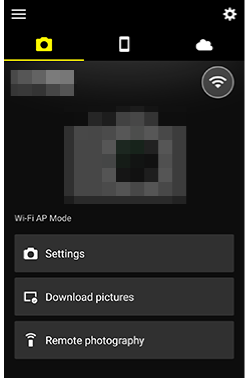
The Connection Status Icon
An icon indicating the connection status is shown at the top right of the
tab display. The statuses indicated by each icon are as follows. : The SnapBridge app is in Wi-Fi AP mode without a Wi-Fi connection to the camera.
 : The smart device is connected to the camera via Wi-Fi.
Ending the Wi-Fi Connection
- Wi-Fi connections to cameras that support SnapBridge and the Wireless Mobile Utility (WMU) can be ended from Wi-Fi settings on the smart device. Ending the connection in the app does not terminate the Wi-Fi connection. The procedure varies with the smart device; see the documentation provided with your device for details.
- Leaving the Wi-Fi connection active not only prevents use of such features as automatic upload to NIKON IMAGE SPACE but also increases the drain on the camera battery.
This feature is not available in the iOS version.