Remote Photography with Live View
The SnapBridge app lets you take photos remotely from a smart device via a Wi-Fi connection. Turn the camera on and tap [Remote photography] in the  tab. A list of the cameras that support this feature can be found here.
Wi-Fi
- If you are unable to connect via Wi-Fi, check here before tapping [Remote photography] again.
- Check that the camera is on before proceeding. You cannot connect the devices via Wi-Fi while the camera is off.
Remote Photography
- If you are using a digital SLR camera, tapping [Remote photography] in SnapBridge while live view is in effect will not display the remote photography dialog. Exit live view before proceeding.
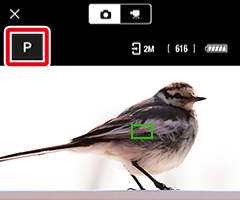
- If you are using a digital SLR or mirrorless camera, set the camera's shooting mode (exposure mode) to P, S, A, or M. Remote photography cannot be performed using any setting other than P, S, A, or M.
- Before beginning remote photography, mount the camera on a tripod or place it on stable, level surface.
Wi‑Fi
The following SnapBridge functions are unavailable when the camera and smart device are connected via Wi-Fi:
- Automatic download of pictures taken (This function can be used when connected via Wi-Fi STA mode.)
- Clock synchronization (This function can be used when connected via Wi-Fi STA mode.)
- Embedding location data in pictures (This function can be used when connected via Wi-Fi STA mode.)
- Connecting to NIKON IMAGE SPACE (This function can be used when connected via Wi-Fi STA mode.)
- The [Nickname] option in the SnapBridge menu
- Bluetooth remote control
- Camera firmware download and transfer
To use these features, terminate the Wi-Fi connection. See here for details on terminating Wi-Fi connections. If you connected in Wi-Fi AP mode or Wi-Fi STA mode, exit the mode and pair the camera and smart device via Bluetooth.
Auto Download
Auto download is available with JPEG and HEIF pictures only. Although remote photography can be used to take pictures in NEF/NRW (RAW) and TIFF formats, the resulting pictures will not be downloaded to the smart device.
- HEIF is available only when HLG is chosen for tone mode on cameras that support tone-mode selection.
- Depending on the camera, JPEG or HEIF copies may be downloaded in place of NEF/NRW (RAW) pictures.
- In the case of pictures created at image quality settings of NEF/NRW (RAW) + JPEG or NEF (RAW) + HEIF, only the JPEG or HEIF copy will be downloaded.
- Videos will not be downloaded automatically.
Taking Photographs
The procedure differs depending on whether the camera is currently connected via Wi-Fi AP mode or Wi-Fi STA mode, or via Bluetooth.
Wi-Fi AP Mode or Wi-Fi STA Mode
Tap [Remote photography] in the
tab to display the view through the camera lens. Proceed to Step 3.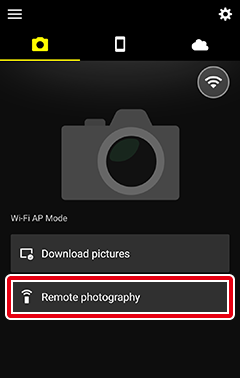
Bluetooth Connection (When the
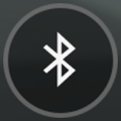 Icon is Displayed)
Tap [Remote photography] in the
tab and proceed to the next step.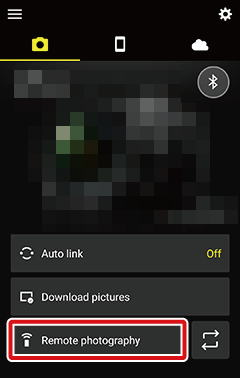
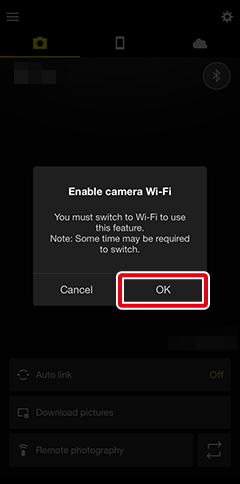
If you are prompted to switch to Wi-Fi, tap [OK] to connect. Shooting controls will be displayed once a Wi-Fi connection has been established.
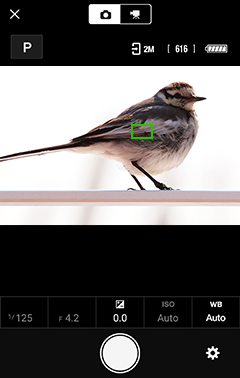
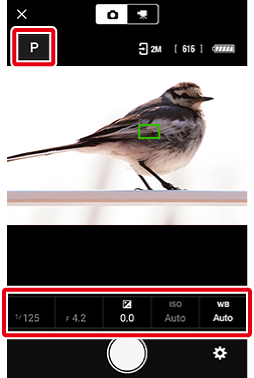
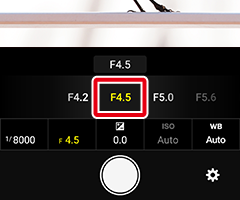
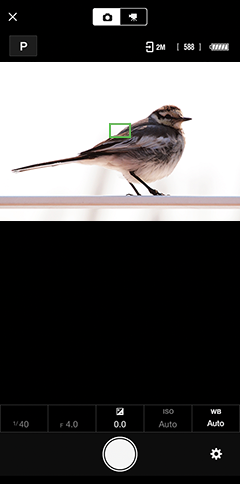
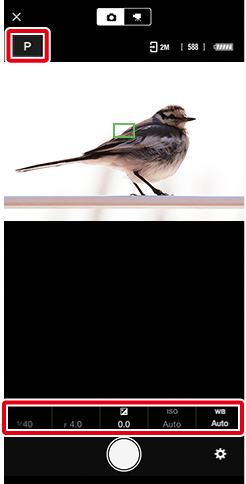
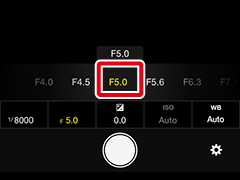
Choose the shooting mode (or exposure mode; P, S, A, or M) and adjust shutter speed, aperture, exposure compensation, ISO sensitivity, and white balance as needed. Tap the area indicated by the red frame, then tap the desired value.
Note that some options may not be available depending on the camera or on camera settings.
Action and Compact Digital Cameras
Shooting settings cannot be changed.
Adjusting Settings
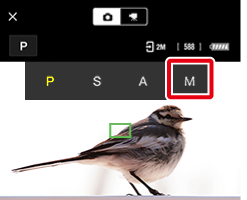
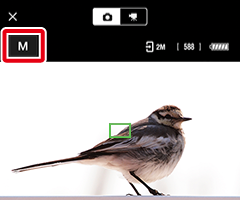
Switching Between P, S, A, and M Shooting Modes (Exposure Modes)
Tap the mode icon.
Tap the desired mode.
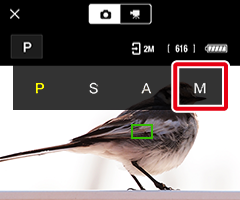
The selected mode will be displayed.

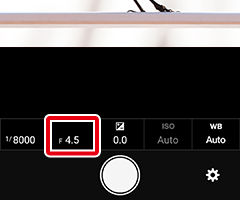
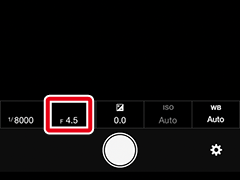
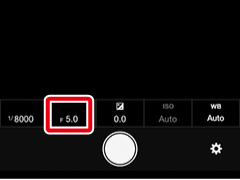
Changing the Shutter Speed and Aperture
Tap the desired item.

When the options are displayed, tap the desired option. The displayed options can be changed by swiping left and right.
The selected option will be displayed.
Check the focus or change the focus position.
SnapBridge-Compatible Action and Compact Digital Cameras
Tap the area outlined in red below to zoom in and out and check focus.

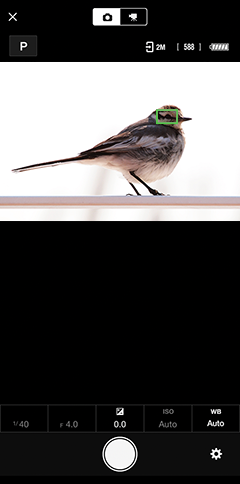
SnapBridge-Compatible Digital Cameras With Interchangeable Lenses
Tap anywhere in the frame to move the focus point. Depending on the camera settings, the camera may automatically focus on a subject that has been recognized.
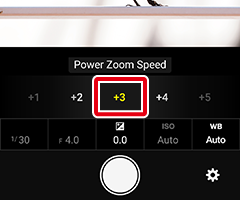
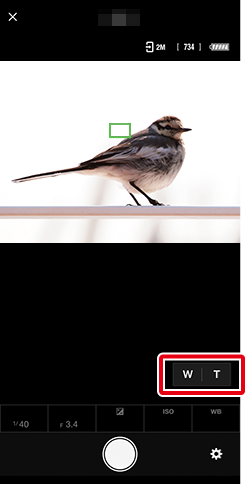
SnapBridge-Compatible Power Zoom Lenses
You can adjust the zoom using SnapBridge when a NIKKOR Z lens featuring power zoom is attached to the camera.
The camera zooms out when W is pressed and zooms in when T is pressed.

You can select the zoom speed by tapping a number. Tap the desired option.
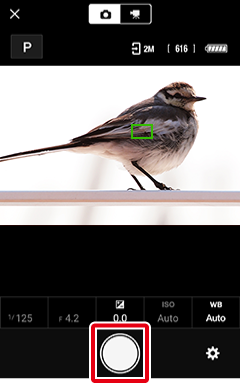
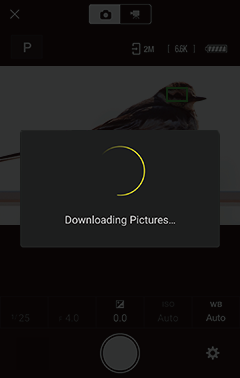
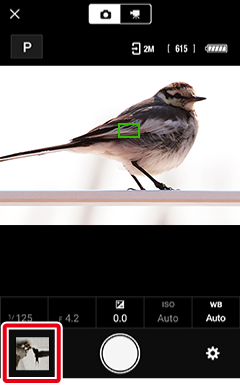
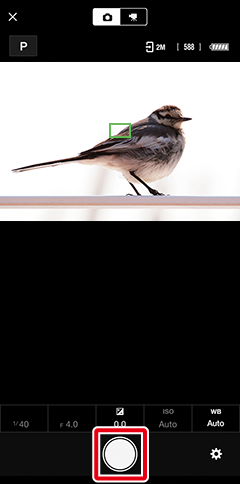
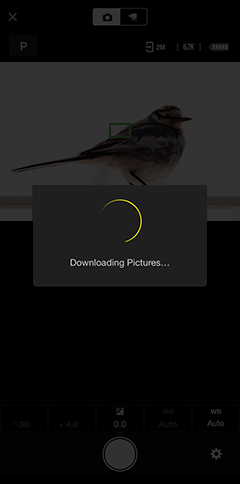
Tap the shutter-release button to take the photo. The photo will be downloaded to the device.
Disabling Auto Download
To disable auto download, select [Download pictures] in the remote photography menu and slide the [Download pictures] switch to
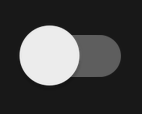 (off).
Tap
 to return to the tab when shooting is complete.
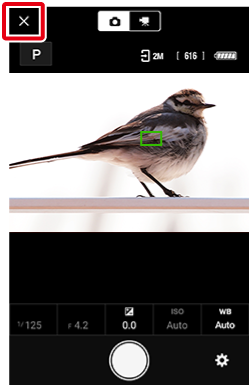
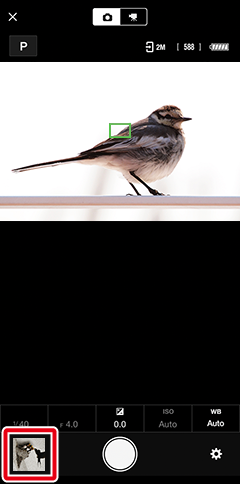
Viewing Photos
The photo last downloaded to the smart device appears in thumbnail area (circled in red) in the shooting display. Tap the thumbnail to view the photo full frame.
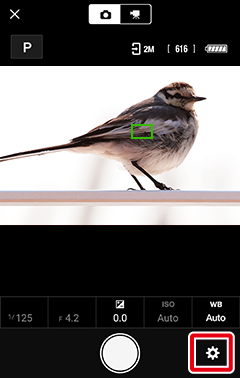
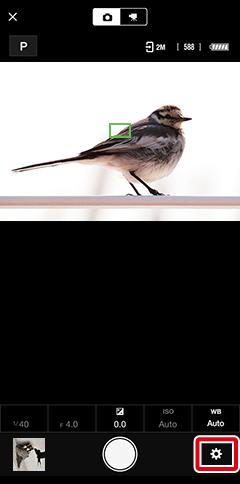
The Remote Photography Menu
To view the remote photography menu, tap the  button.
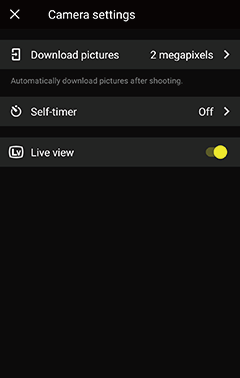
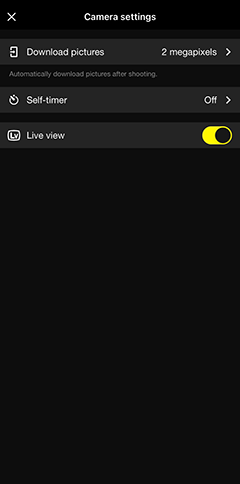
- Download pictures
Choose whether pictures are automatically downloaded to the smart device as they are taken. The size at which the photos are downloaded can be chosen using [Choose download size]. Choose [2 megapixels] to download pictures at a size of 2 megapixels, [8 megapixels (4K)] to download pictures at a size of 8 megapixels, or [Original format] to download the pictures at the size selected on the camera.
- [Choose download size] is available only when [Download pictures] is enabled (
 ).
). - [8 megapixels (4K)] is available only with cameras that support 8 megapixel download.
- Selecting [Original format] for [Choose download size] when downloading pictures taken with an NEF/NRW (RAW) option selected for image quality on the camera downloads a 2 megapixel JPEG copy. The JPEG copy will be downloaded at a size of 8 megapixels if the camera supports 8 megapixel download.
- Pictures taken using cameras that support tone-mode selection with HLG chosen for tone mode and an NEF (RAW) option selected for image quality will be downloaded in HEIF at a size of 2 megapixels, regardless of the option selected for [Choose download size].
- [Choose download size] is available only when [Download pictures] is enabled (
- Self-timer
- Turn this option on () to take photos with the self-timer. The delay before the shutter is released can be chosen from [3], [5], and [10] seconds. Tap again to turn the timer off ().
- Live view
- If this option is on (), the smart device will display view through the camera lens. If it is off (), the view through the lens will not be displayed but the drain on the batteries in the camera and smart device will be reduced.
Wi-Fi
- If you are unable to connect via Wi-Fi, check here before tapping [Remote photography] again.
- Check that the camera is on before proceeding. You cannot connect the devices via Wi-Fi while the camera is off.
Remote Photography
- If you are using a digital SLR camera, tapping [Remote photography] in SnapBridge while live view is in effect will not display the remote photography dialog. Exit live view before proceeding.
- If you are using a digital SLR or mirrorless camera, set the camera's shooting mode (exposure mode) to P, S, A, or M. Remote photography cannot be performed using any setting other than P, S, A, or M.
- Before beginning remote photography, mount the camera on a tripod or place it on stable, level surface.
Wi‑Fi
The following SnapBridge functions are unavailable when the camera and smart device are connected via Wi-Fi:
- Automatic download of pictures taken (This function can be used when connected via Wi-Fi STA mode.)
- Clock synchronization (This function can be used when connected via Wi-Fi STA mode.)
- Embedding location data in pictures (This function can be used when connected via Wi-Fi STA mode.)
- Connecting to NIKON IMAGE SPACE (This function can be used when connected via Wi-Fi STA mode.)
- The [Nickname] option in the SnapBridge menu
- Bluetooth remote control
- Camera firmware download and transfer
To use these features, terminate the Wi-Fi connection. See here for details on terminating Wi-Fi connections. If you connected in Wi-Fi AP mode or Wi-Fi STA mode, exit the mode and pair the camera and smart device via Bluetooth.
Auto Download
Auto download is available with JPEG and HEIF pictures only. Although remote photography can be used to take pictures in NEF/NRW (RAW) and TIFF formats, the resulting pictures will not be downloaded to the smart device.
- HEIF is available only when HLG is chosen for tone mode on cameras that support tone-mode selection.
- Depending on the camera, JPEG or HEIF copies may be downloaded in place of NEF/NRW (RAW) pictures.
- In the case of pictures created at image quality settings of NEF/NRW (RAW) + JPEG or NEF (RAW) + HEIF, only the JPEG or HEIF copy will be downloaded.
- Pictures taken with HLG chosen for tone mode on cameras that support tone-mode selection will not be downloaded automatically to devices running iOS 14 or earlier.
- Videos will not be downloaded automatically.
Taking Photographs
The procedure differs depending on whether the camera is currently connected via Wi-Fi AP mode or Wi-Fi STA mode, or via Bluetooth.
Wi-Fi AP Mode or Wi-Fi STA Mode
Tap [Remote photography] in the
tab to display the view through the camera lens. Proceed to Step 3.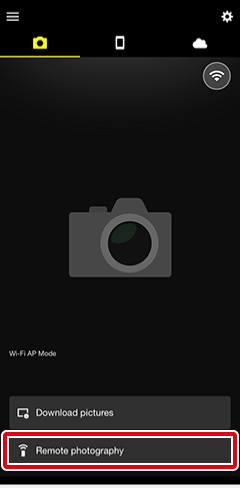
Bluetooth Connection (When the
Icon is Displayed)Tap [Remote photography] in the
tab and proceed to the next step.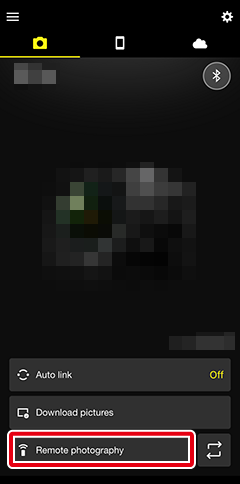
If you are prompted to switch to Wi-Fi, connect to the camera via Wi-Fi by following these instructions. Shooting controls will be displayed once a Wi-Fi connection has been established.
Choose the shooting mode (or exposure mode; P, S, A, or M) and adjust shutter speed, aperture, exposure compensation, ISO sensitivity, and white balance as needed. Tap the area indicated by the red frame, then tap the desired value.
Note that some options may not be available depending on the camera or on camera settings.
Action and Compact Digital Cameras
Shooting settings cannot be changed.
Adjusting Settings
Switching Between P, S, A, and M Shooting Modes (Exposure Modes)
Tap the mode icon.

Tap the desired mode.
The selected mode will be displayed.
Changing the Shutter Speed and Aperture
Tap the desired item.
When the options are displayed, tap the desired option. The displayed options can be changed by swiping left and right.
The selected option will be displayed.
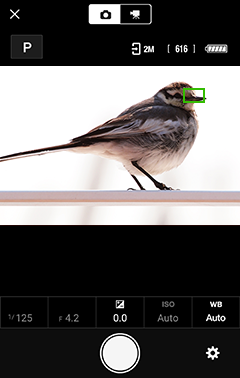
Check the focus or change the focus position.
SnapBridge-Compatible Action and Compact Digital Cameras
Tap the area outlined in red below to zoom in and out and check focus.
SnapBridge-Compatible Digital Cameras With Interchangeable Lenses
Tap anywhere in the frame to move the focus point. Depending on the camera settings, the camera may automatically focus on a subject that has been recognized.
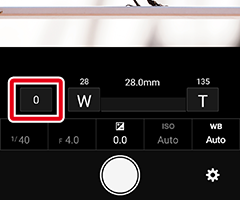
SnapBridge-Compatible Power Zoom Lenses
You can adjust the zoom using SnapBridge when a NIKKOR Z lens featuring power zoom is attached to the camera.
The camera zooms out when W is pressed and zooms in when T is pressed.
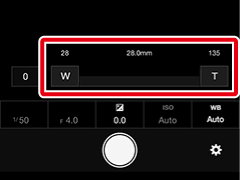
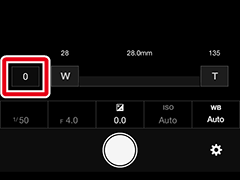
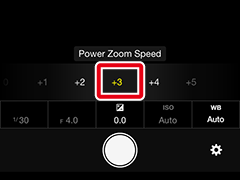
You can select the zoom speed by tapping a number. Tap the desired option.
Tap the shutter-release button to take the photo. The photo will be downloaded to the device.
Disabling Auto Download
To disable auto download, select [Download pictures] in the remote photography menu and slide the [Download pictures] switch to
 (off).
Tap
to return to the tab when shooting is complete.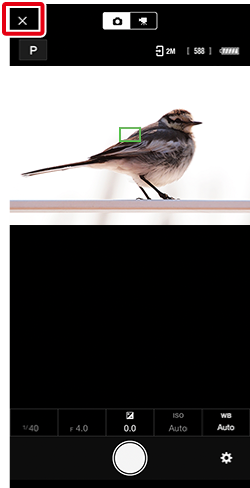
Viewing Photos
The photo last downloaded to the smart device appears in thumbnail area (circled in red) in the shooting display. Tap the thumbnail to view the photo full frame.
The Remote Photography Menu
To view the remote photography menu, tap the button.
- Download pictures
Choose whether pictures are automatically downloaded to the smart device as they are taken. The size at which the photos are downloaded can be chosen using [Choose download size]. Choose [2 megapixels] to download pictures at a size of 2 megapixels, [8 megapixels (4K)] to download pictures at a size of 8 megapixels, or [Original format] to download the pictures at the size selected on the camera.
- [Choose download size] is available only when [Download pictures] is enabled (
 ).
). - [8 megapixels (4K)] is available only with cameras that support 8 megapixel download.
- Selecting [Original format] for [Choose download size] when downloading pictures taken with an NEF/NRW (RAW) option selected for image quality on the camera downloads a 2 megapixel JPEG copy. The JPEG copy will be downloaded at a size of 8 megapixels if the camera supports 8 megapixel download.
- Pictures taken using cameras that support tone-mode selection with HLG chosen for tone mode and an NEF (RAW) option selected for image quality will be downloaded in HEIF at a size of 2 megapixels, regardless of the option selected for [Choose download size].
- [Choose download size] is available only when [Download pictures] is enabled (
- Self-timer
- Turn this option on () to take photos with the self-timer. The delay before the shutter is released can be chosen from [3], [5], and [10] seconds. Tap again to turn the timer off ().
- Live view
- If this option is on (), the smart device will display view through the camera lens. If it is off (), the view through the lens will not be displayed but the drain on the batteries in the camera and smart device will be reduced.